
Network
A computer network connects devices like computers, servers, routers, and other hardware to share data, resources, and services. These networks create pathways for information to flow between devices, enabling activities such as sending emails, browsing the web, streaming video, or participating in video calls.
Computer networks can vary in size and complexity. Local Area Networks (LANs) connect devices within small areas like homes, offices, or schools. Wide Area Networks (WANs) cover larger geographic regions, linking offices, data centers, or even countries. The internet is the largest global network, connecting billions of devices worldwide.
Networks are essential for our daily digital lives, supporting personal communication, business operations, online education, healthcare systems, financial transactions, cloud computing, and many other services. They rely on protocols, hardware, and security measures to ensure data is transmitted efficiently, reliably, and safely between devices.
Network Security
Network security refers to methods, technologies, and procedures used to protect computer networks and their resources from unauthorized access, misuse, modification, or disruption. It ensures sensitive information (such as personal data, financial records, or confidential business information) remains safe while maintaining the availability and integrity of network services
Network security covers a wide range of practices including:
- Access Control: Restricting who can connect to the network or access specific resources using passwords, authentication systems, or multi-factor authentication (MFA).
- Firewalls: Devices or software that monitor and filter incoming and outgoing traffic to block malicious activity.
- Intrusion Detection and Prevention: Systems that detect unusual or suspicious activity and respond to potential threats.
- Encryption: Protecting data in transit by converting it into a format unreadable by unauthorized users.
- Network Monitoring: Continuously observing network traffic and performance to identify potential security breaches or vulnerabilities.
- Regular Updates and Patching: Ensuring network devices and software are up to date to protect against known vulnerabilities.
Effective network security not only prevents unauthorized access but also reduces the risk of data breaches, malware infections, and service disruptions, helping maintain trust, reliability, and operational continuity for individuals and organizations alike.
Protocols
In networking, a protocol is a formal set of rules and conventions that govern how devices communicate over a network. Protocols define data formatting, transmission, routing, and reception, ensuring information from one device can be correctly interpreted by another, even if they are from different manufacturers or run different software. They cover aspects like error detection, data compression, addressing, encryption, and session management, making communication reliable and secure.
Examples of common network protocols include:
- HTTP/HTTPS: For web traffic
- FTP (File Transfer Protocol): Transfers files between a client and server
- SSH (Secure Shell Protocol): Enables secure communication between two computers
- Telnet: Enables communication between two computers
- SMTP (Simple Mail Transfer Protocol): Sends, receives, and relays emails
- DNS (Domain Name System): Translates human-readable hostnames into IP addresses
- TCP/IP (Transmission Control Protocol/Internet Protocol): For end-to-end communication
- IMAP (Internet Message Access Protocol): Retrieves messages from email servers
- HTTPS: Securely transports data between a client and web server
- Microsoft Directory Services (Microsoft-DS): Used for file sharing over TCP/IP by SMB service
- MySQL: Relational database management system
- RDP (Remote Desktop Protocol, ms-wbt-server): Interacts with a desktop computer remotely
- VNC (Viewer Remote Desktop): Interacts with a desktop computer remotely
By following standardized protocols, networks achieve interoperability, efficiency, and consistency, allowing diverse systems to work together seamlessly.
Open Systems Interconnection (OSI)
The Open Systems Interconnection (OSI) model is a standardized framework for understanding and implementing network communications. It consists of seven distinct layers, each defining specific functions and protocols to ensure successful data exchange between devices on a network. The layers, from bottom to top, are Physical, Data Link, Network, Transport, Session, Presentation, and Application.
The OSI model provides a structured approach to designing and troubleshooting networks by clearly separating different network functions, such as how data is physically transmitted, how devices are addressed and routed, how data integrity is ensured, and how applications access network services. Introduced in the 1980s based on ISO recommendations, the OSI model serves as a universal reference that promotes interoperability between hardware and software from different vendors, making it easier to design, manage, and maintain complex network systems.
Layers
| Layer 7 | Application | HTTP, HTTPS, FTP, SMTP | Host Layer |
| Layer 6 | Presentation | ASCII, JPEG, GZIP | Host Layer |
| Layer 5 | Session | Socket | Host Layer |
| Layer 4 | Transport | TCP, UDP | Host Layer |
| Layer 3 | Network | IPv4, IPv6, IPSec | Media Layer |
| Layer 2 | Data Link | PPP, IEEE, L2TP, Ethernet | Media Layer |
| Layer 1 | Physical | Cables, Wireless | Media Layer |
OSI in Action – Browsing The Internet (Web Client)
| Layer 7 | Application | HTTP | the client uses a web browser to send http data |
| Layer 6 | Presentation | GZIP | handles the data format and compresses it (If applicable) |
| Layer 5 | Session | Socket | opens a session for communication between source and destination (Web Server) |
| Layer 4 | Transport | TCP | data is segmented, and each segment will have the source and destination port number |
| Layer 3 | Network | IPv4 | converts segments into packets; each packet will have the source and destination IP address |
| Layer 2 | Data Link | Ethernet | converts packets into frames; each frame will have the source and destination MAC address |
| Layer 1 | Physical | Coax | converts frames into bit-stream and send the data over the physical medium |
OSI in Action – Browsing The Internet (Web Server)
| Layer 1 | Physical | Coax | converts bit-stream into frames |
| Layer 2 | Data Link | Ethernet | merges all frames into packets |
| Layer 3 | Network | IPv4 | converts packets into segments |
| Layer 4 | Transport | TCP | converts segments into data |
| Layer 5 | Session | Socket | data is kept |
| Layer 6 | Presentation | GZIP | decompresses data and reverts the formatting |
| Layer 7 | Application | HTTP | the destination receives the client http data |
Python Web Server
Python has a built-in package called http.server that can be used as file server or a customized web server that handles HTTP(s) requests.
How to Run http.server (Default)
In the terminal, go to the directory that has the static content (files, images, etc..) and type python3 -m http.server, this serves the directory content to clients (Some threat actors utilize this method when they breach a network, Python is most likely running on the devices, so it’s used to move data in the breached network). After running the http.server it will show if it was successful or not, and the port that’s used
python3 # Python using version 3
-m # Tell Python to run a module as a script
http.server # Start the built-in HTTP file server on port 8000 (default)
(RPi) python3 -m http.server
Serving HTTP on :: port 8000 (http://[::]:8000/)
The output will change depending on the directory (folder) from which the server is started
<html>
<head>
<meta http-equiv="Content-Type" content="text/html; charset=utf-8">
<title>Directory listing for /</title>
</head>
<body>
<h1>Directory listing for /</h1>
<hr>
<ul>
<li><a href=".bash_history">.bash_history</a></li>
How to Run http.server (Customized)
The course content is built around a customized webserver that responds to HTTP GET requests, handles sessions/compressions, and logs requests. You may need to install a package called netifaces using pip3 install netifaces (In case you do not want to run the server or having issues with it, there is a Wireshark dump that was captured while interacting with the customized webserver, skip these steps)
pip3 # The Python 3 package installer (runs pip for Python 3.x)
install # The command telling pip3 to install a package
netifaces # The name of the package to install, provides access to network interface information (IP, MAC addresses)
(RPi) pip3 install netifacesThen copy the following into a file (E.g. server.py)
from http.server import SimpleHTTPRequestHandler # Import the built-in HTTP request handler
from socketserver import TCPServer # Import a basic TCP server implementation
from io import BytesIO # Import BytesIO to handle bytes in memory (for gzip compression)
from gzip import GzipFile # Import GzipFile to compress HTTP response
from datetime import datetime # Import datetime to generate timestamps for logging
from contextlib import suppress # Import suppress to prevent crasheswith suppress(Exception): # Try importing network interface details
from netifaces import gateways, ifaddresses, AF_INET, AF_LINK # Network interface utilities
print(“The default network interface is: “, gateways()[‘default’][AF_INET][1]) # Display default network interface name
print(“The default network interface mac address is: “, ifaddresses(gateways()[‘default’][AF_INET][1])[AF_LINK]) # Display MAC address of the default network interfaceclass Server(SimpleHTTPRequestHandler): # Define a custom HTTP server
def do_GET(self): # Handle HTTP GET requests
compressed = False # Track whether gzip compression is used
content = b'<HTML><h1>Hello World!</h1></HTML>’ # HTTP response body (bytes)if len(content) > 0: # Only attempt compression if content exists
if ‘accept-encoding’ in self.headers: # Check if client sent Accept-Encoding header
if ‘gzip’ in self.headers[‘accept-encoding’]: # Client supports gzip
bytes_ = BytesIO() # Create an in-memory byte buffer
with GzipFile(fileobj=bytes_, mode=’w’, compresslevel=5) as f: # Gzip wrapper
f.write(content) # Compress the response body
content = bytes_.getvalue() # Replace content with compressed bytes
compressed = True # Mark response as compressedself.send_response(200) # Send HTTP 200 OK status
if compressed:
self.send_header(‘content-encoding’, ‘gzip’) # Notify client of gzip encoding
self.send_header(‘content-length’, len(content)) # Send content length header
self.end_headers() # End HTTP headers
self.wfile.write(content) # Write response body to clientdef log_message(self, format, *args): # Override default request logging
print(“[{}] – {}:{} – {} {}”.format( # Custom log format
datetime.now().strftime(“%m/%d/%Y %H:%M:%S”), # Timestamp
self.client_address[0], # Client IP address
self.client_address[1], # Client source port
args[0], # HTTP method
args[1] # Requested path
))TCPServer((‘0.0.0.0’, 80), Server).serve_forever() # Start server on all interfaces, port 80
from http.server import SimpleHTTPRequestHandler
from socketserver import TCPServer
from io import BytesIO
from gzip import GzipFile
from datetime import datetime
from contextlib import suppress

with suppress(Exception):
    from netifaces import gateways, ifaddresses, AF_INET, AF_LINK
    print("The default network interface is: ",gateways()['default'][AF_INET][1])
    print("The default network interface mac address is: ",ifaddresses(gateways()['default'][AF_INET][1])[AF_LINK])

class Server(SimpleHTTPRequestHandler):
    def do_GET(self):
        compressed = False
        content = b'<HTML><h1>Hello World!</h1></HTML>'
        if len(content) > 0:
            if 'accept-encoding' in self.headers:
                if 'gzip' in self.headers['accept-encoding']:
                    bytes_ = BytesIO()
                    with GzipFile(fileobj=bytes_, mode='w', compresslevel=5) as f:
                        f.write(content)
                        f.close()
                        content = bytes_.getvalue()
                        compressed = True
        self.send_response(200)
        if compressed:
            self.send_header('content-encoding', 'gzip')
        self.send_header('content-length', len(content))
        self.end_headers()
        self.wfile.write(content)

    def log_message(self, format, *args):
        print("[{}] - {}:{} - {} {}".format(datetime.now().strftime("%m/%d/%Y %H:%M:%S"), self.client_address[0],self.client_address[1],args[0],args[1]))

TCPServer(('0.0.0.0', 80), Server).serve_forever()
Then run the file as Python script with elevated privileges, the reason why you need to elevate privileges because the customized webserver is using port 80 (Port below 1024 can be open only with elevated privileges, E.g. root)
sudo # Run the command with superuser (root) privileges
python3 # Run the Python 3 interpreter
server.py # The Python script file to execute (in this case, your HTTP server)
(RPi) sudo python3 server.py
The default network interface is:  eth0
The default network interface mac address is:  [{'addr': 'bc:f2:b8:57:86:02'}]
You can either use a web browser or client to communicate with that server, the content URL in this case is http://127.0.0.1:80
curl # A command-line tool used to send requests and receive responses
http://127.0.0.1:80 # Send an HTTP GET request to the local Python http.server running on port 80
(RPi) curl http://127.0.0.1:80

<HTML><h1>Hello World!</h1></HTML>
Packet Analyzer (Wireshark)
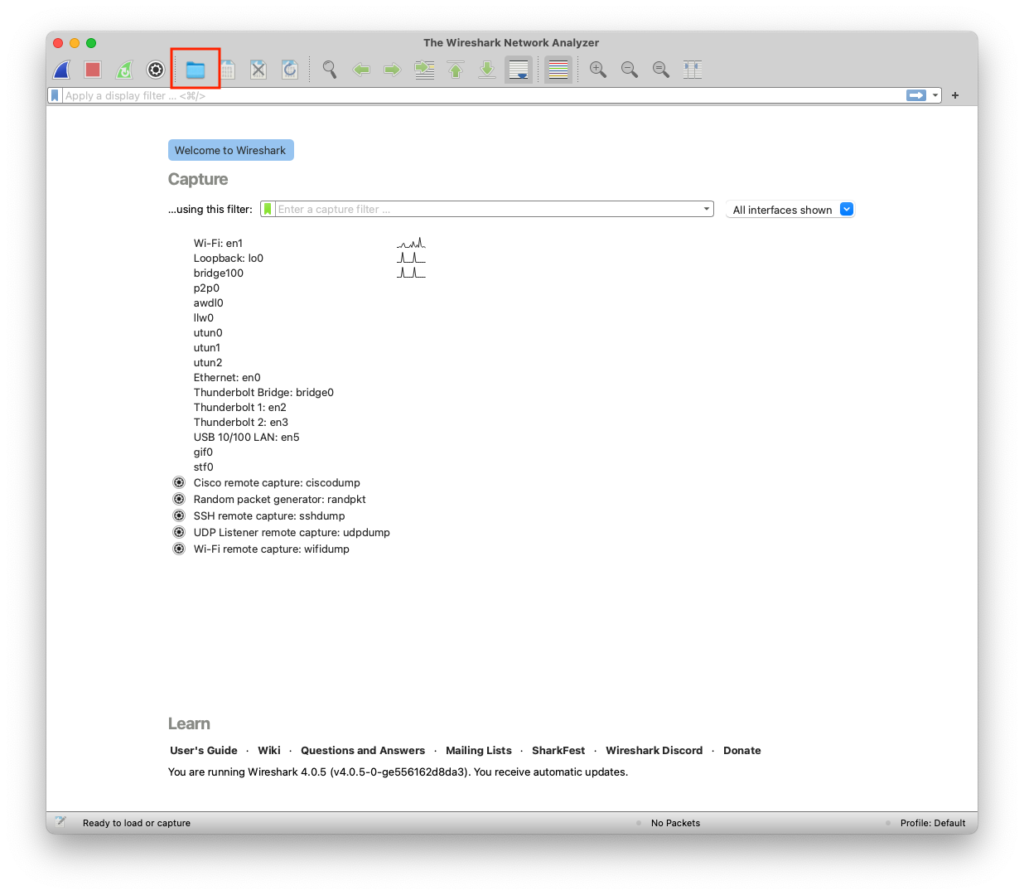
A tool or device for capturing and analyzing packets of data traveling in a communication channel. Click on open a capture file, then open the following http.pcapng file
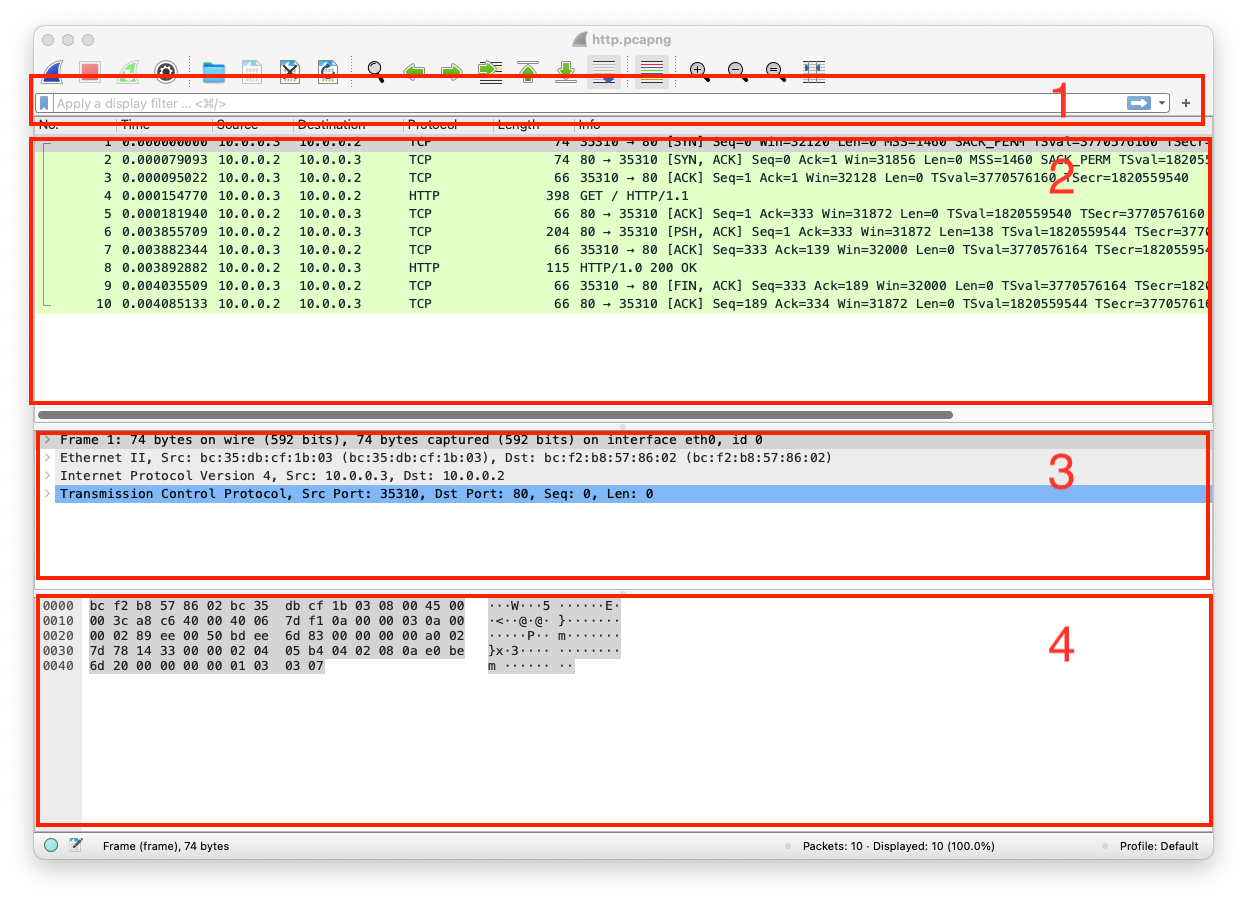
There are four important sections in Wireshark
- Filter Bar – You can filter the traffic based on specific rules like IP, port, or protocol
- Packets List – This shows the traffic as entries and you click on any of the entries for more details, or you can sort them by time, IP, etc..
- Packet Details – When you click on an entry, the details of that entry will show up in this section
- Packet bytes – You can review any packet bytes in this section, if you click on any byte, it will show the meaning of it in the Packet Details section (This is a very helpful feature)
